Getting started with ILAMB at NCI#
As earth system models (ESMs) become increasingly complex, there is a growing need for comprehensive and multi-faceted evaluation of model projections. The International Land Model Benchmarking (ILAMB) project is a model-data intercomparison and integration project designed to improve the performance of land models and, in parallel, improve the design of new measurement campaigns to reduce uncertainties associated with key land surface processes.
This document explains how to run the International Land Model Benchmarking (ILAMB) and International Ocean Model Benchmarking (IOMB) model evaluation tools on NCI infrastracture.
The documentation provided here is designed to supplement, rather than replace, the official ILAMB documentation. This documentation is tailored to using the tool within the NCI infrastructure. We encourage users to read the ILAMB documentation and to try on the ILAMB Tutorial.
ILAMB development is primarily performed by the RUBISCO Science Focus Area and supported by the RGMA Activity of the EESSD division of the BER program in the United States Department of Energy’s Office of Science.
How to cite ILAMB?#
Collier, N., Hoffman, F. M., Lawrence, D. M., Keppel-Aleks, G., Koven, C. D., Riley, W. J., et al. (2018). The International Land Model Benchmarking (ILAMB) system: Design, theory, and implementation. Journal of Advances in Modeling Earth Systems, 10, 2731–2754. https://doi.org/10.1029/2018MS001354
ILAMB CMIP confrontations maintained by ACCESS-NRI#
While the datasets and software found on this site can be used to confront models, we also maintain a collection of results for the community use. Below is a short description of each along with a preview and links to the full results page.
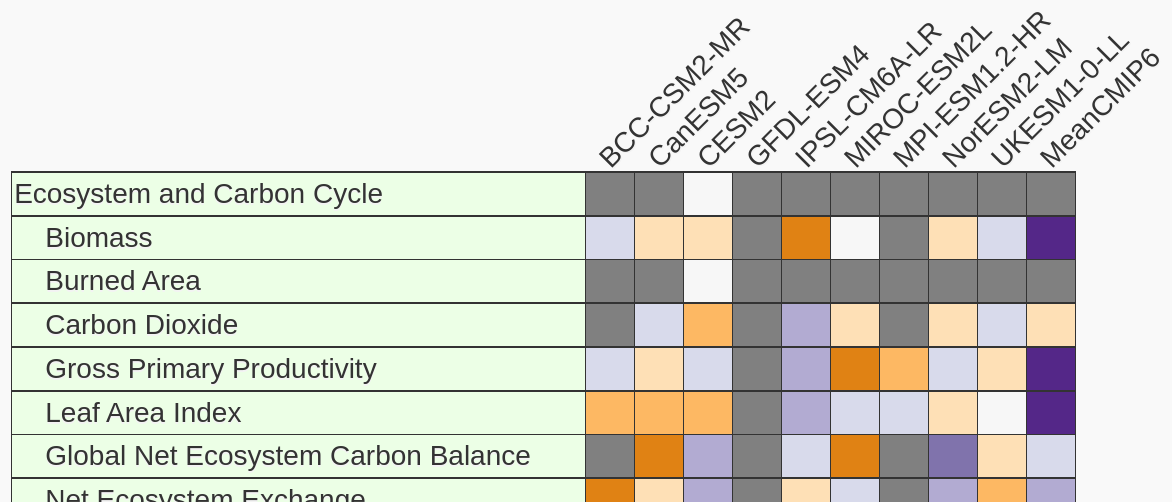
Land Comparison of CMIP5 and CMIP6 Models
We examine the performance of historical simulations from a selection of coupled Earth system models with a contribution in the CMIP5 and CMIP6 eras.

Land Comparison of CMIP6 Models
This land-focused study includes coupled model results for the historical experiment from the CMIP6 era. We also use this as a testing ground to include new datasets and additional models. If you have a suggestion of a reference dataset or would like to request we include a model, please raise an issue.
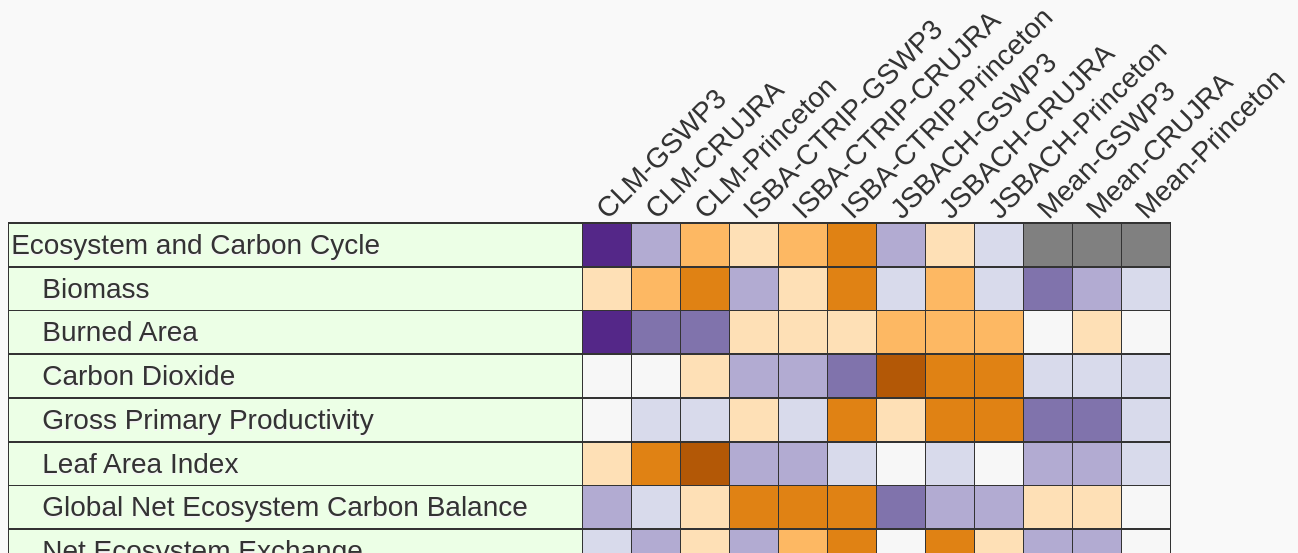
Land Comparison of Offline CMIP6 Models
We examine performance differences among a selection of land models (CLM, ISBA-CTRIP, and JSBACH) run using different forcings (GSWP3, CRUJRA, and Princeton).
Ocean Comparison of CMIP5 and CMIP6 Models
While the focus of ILAMB has been on land, we also have used the software to compare ocean model output which we refer to as International Ocean Model Benchmarking (IOMB). This study is analagous to the land comparison of CMIP5 and CMIP6 era models over the historical period.

Observations and Model outputs available at NCI.#
We currently only support CF-compliant observational datasets and their confrontation with CMORised model outputs.
The ILAMB-DATA collection aggregates data from various sources and formats in a CF-compliant, netCDF4 files which can be used for model benchmarking via ILAMB. The collection has been replicated in the ACCESS-NRI Replicated Datasets for Climate Model Evaluation and is maintained by the ACCESS-NRI Model Evaluation and Diagnostics team. Please contact the ACCESS-NRI team if you requires help with datasets. The ILAMB-DATA is an Open Source project which welcomes contributions from the community.

You can request access to the ACCESS-NRI collection.
Depending on their needs, users may require access to a range of NCI data collections and projects. Here we list the NCI collections required to run the CMIP confrontations examples available with ILAMB (see here):
| Project Name | Project Code | DOI |
|---|---|---|
| Earth System Grid Federation (ESGF) Australian CMIP6-era Datasets | fs38 join | 10.25914/5e6acd0492b39 |
| Earth System Grid Federation (ESGF) Replicated CMIP6-era Datasets | oi10 join | 10.25914/Q1CT-RM13 |
| CSIRO-Mk3-6-0 model output prepared for CMIP5 | rr3 join | N/A |
| Earth System Grid Federation (ESGF) Replicated CMIP5-era Datasets | al33 join | 10.25914/5b98b0f5ef29d |
Project for data analysis:
| Project Name | Project Code |
|---|---|
| ACCESS Analysis Environments | xp65 join |
ILAMB on NCI-Gadi#
For NCI users, ACCESS-NRI is providing a conda environment with the latest version of ILAMB through project xp65.
To load the module via project xp65, you need to prompt:
>>> module use /g/data/xp65/public/modules
>>> module load conda/analysis3
To run ilamb, you need to execute the command ilamb-run with a number of arguments/files:
ilamb-run --config config.cfg --model_setup model_setup.txt --regions global
config.cfgdefines which observables and observational datasets will be comparedmodel_setup.txtdefines the paths of the models that will be compared
Below we explain how to setup the necessary directory structures and the example files mentioned above. For detailed information on the arguments of ilamb-run, please consult the official ILAMB documentation.
ILAMB directory structure#
ILAMB_ROOT#
ILAMB requires files to be organised in a specific directory structure of DATA and MODELS.
The root of this directory structure is the ILAMB_ROOT path (you should export it as $ILAMB_ROOT):
export ILAMB_ROOT=PATH/OF/ILAMB_ROOT/DIRECTORY
The following tree represents a typical ILAMB_ROOT setup for CMIP comparison on NCI/Gadi:
$ILAMB_ROOT/
|-- DATA -> /g/data/ct11/access-nri/replicas/ILAMB
`-- MODELS
    |-- ACCESS-ESM1-5
    |   `-- historical
    |       `-- r1i1p1f1
    |           |-- cSoil.nc -> /g/data/fs38/publications/CMIP6/CMIP/CSIRO/ACCESS-ESM1-5/historical/r1i1p1f1/Emon/cSoil/gn/latest/cSoil_Emon_ACCESS-ESM1-5_historical_r1i1p1f1_gn_185001-201412.nc
There are two main branches in this directory:
the
DATAdirectory: this is where we keep the observational datasets each in a subdirectory bearing the name of the variable. This directory can be setup as a symlink to the ACCESS-NRI Replicated Datasets for Climate Model Evaluation .the
MODELdirectory: this directory can be populated with symbolic links to the model outputs.
To facilitate the setup of an ILAMB-ROOT tree. ACCESS-NRI provides a tool to automatically generate the required folder structure.
The ilamb-tree-generator is available in the access-med environment of the xp65 project.
The tool will automatically create the folder structure above. Models output can be added by listing them in a yaml file as follow:
datasets:
  - {mip: CMIP, institute: CSIRO, dataset: ACCESS-ESM1-5, project: CMIP6, exp: historical, ensemble: r1i1p1f1}
  - {mip: CMIP,institute: BCC, dataset: BCC-ESM1, project: CMIP6, exp: historical, ensemble: r1i1p1f1}
  - {mip: CMIP,institute: CCCma, dataset: CanESM5, project: CMIP6, exp: historical, ensemble: r1i1p1f1}
  - {mip: LUMIP,institute: CSIRO, dataset: ACCESS-ESM1-5, project: CMIP6, exp: hist-noLu, ensemble: r1i1p1f1}
The tool can then be run from the command line:
ilamb-tree-generator --datasets models.yml --ilamb_root $ILAMB_ROOT
Note that in order to access these models on Gadi, you will need to join the NCI projects that are associated with the models originally paths and you will need to add these projects to the storage access keywords for computing jobs lateron.
ILAMB configuration file: config.cfg#
Now that we have the data, we need to setup a configure file which the ILAMB package will use to initiate a benchmark study. With this file, you configure comparison sections and define which variables from which dataset will be compared. You can find more information on adjusting this file on the official ILAMB documentation.
An example configure file for ILAMB on Gadi could be called config.cfg and look like this for comparing your models with two variables of the radiation and energy cycle as measured by Clouds and the Earth’s Radiant Energy System (CERES) project:
# This configure file specifies comparison sections, variables and observational data for running ILAMB on Gadi.

# See https://www.ilamb.org/doc/first_steps.html#configure-files for the ILAMB Tutorial that addesses Configure Files

# Structure:
# [h1:] Sections
# [h2:] Variables
# [...] Observational Datasets and their paths

############################################################################

[h1: Radiation and Energy Cycle]

[h2: Surface Upward SW Radiation]
variable = "rsus"

[CERES]
source   = "DATA/rsus/CERESed4.1/rsus.nc"

[h2: Albedo]
variable = "albedo"
derived  = "rsus/rsds"

[CERES]
source   = "DATA/albedo/CERESed4.1/albedo.nc"
ILAMB model selection: model_setup.txt#
In the model_setup.txt, you can select all the model output that you want to compare.
Remember that ILAMB is expecting the model output and its variables to be saved in a specific format. See the above ILAMB_ROOT/MODELS description on how to find and create the correct links.
Assuming you want to compare the three models that we used in ILAMB_ROOT/MODELS (ACCESS-ESM1.5, BCC-ESM1, and CanESM5), you would need to create a model_setup.txt file wehere you define both the model labels and their paths:
# Model Name (used as label), ABSOLUTE/PATH/TO/MODELS or relative to $ILAMB_ROOT/ , Optional comments
ACCESS_ESM1-5_r1i1p1f1      , MODELS/ACCESS-ESM1-5/historical/r1i1p1f1              , CMIP6
BCC-ESM1_r1i1p1f1           , MODELS/BCC-ESM1/historical/r1i1p1f1                   , CMIP6
CanESM5_r1i1p1f1            , MODELS/CanESM5/historical/r1i1p1f1                    , CMIP6
Run ILAMB#
Now that we have the configuration file set up, you can run the study using the ilamb-run script via the aforementioned
ilamb-run --config config.cfg --model_setup model_setup.txt --regions global
Because of the computational costs, you need to run ILAMB through a Portable Batch System (PBS) job on Gadi.
Submitting a PBS job#
The following default PBS file, let’s call it ilamb_test.job, can help you to setup your own, while making sure to use the correct project (#PBS -P) to charge your computing cost to:
#!/bin/bash

#PBS -N ilamb_test
#PBS -l wd
#PBS -P your_compute_project_here
#PBS -q normalbw
#PBS -l walltime=0:20:00
#PBS -l ncpus=14
#PBS -l mem=63GB
#PBS -l jobfs=10GB
#PBS -l storage=gdata/ct11+gdata/xp65+gdata/fs38+gdata/oi10

# ILAMB is provided through projects xp65. We will use the latter here
#module use /g/data/xp65/public/modules
#module load conda/analysis3

# Define the ILAMB Path, expecting it to be where you start this job from
export ILAMB_ROOT=./
export CARTOPY_DATA_DIR=/g/data/xp65/public/apps/cartopy-data

# Run ILAMB in parallel with the config.cfg configure file for the models defined in model_setup.txt
mpiexec -n 10 ilamb-run --config config.cfg --model_setup model_setup.txt --regions global
You should adjust this file to your own specifications (including the storage access to your models). Save the file in the $ILAMB_ROOT and submit its job to the queue from there via
qsub ilamb_test.job
Running this job will create a _build directory with the comparison results within $ILAMB_ROOT. You can adjust the place of this directory via a agrument --build_dir argument for ilamb-run.
Visualisation of ILAMB outputs#
Result visualisation is an important part of ilamb, it provide a lot of visualized graphs to allow users to evaluate the performance of each models for various aspects. The result is shown in an html page.
NCI provides a web-based graphical interface of the Australian Research Environment (ARE) for such purposes.
Australian Research Environment (ARE)#
ARE is a web-based graphical interface for performing your computational research. It combines the familiarity of your regular desktop/laptop with the power of NCI’s world-class research HPC capabilities. ARE gives you access to NCI’s Gadi supercomputer and data collections, all from a simple, graphical interface. ARE consists of a number of applications that support your research such as Virtual Desktop, JupyterLab, Terminal, etc.
In this tutorial, we mainly provide guidance for use ARE for ilamb result. For user who want more imformation about ARE, you can find it here.
Access to ARE#
ARE can be accessed at are.nci.org.au. NCI users can use NCI username and password to login. If you are a new user of NCI, please apply an account at here.
Virtual Desktop#
When you log into ARE, click Virsual Desktop Instance(VDI), and you will see the setup page, it will setup the VDI just like you setup your PBS job on NCI CLI, so just follow the instruction on the page. Make sure that the project on which your ilamb data is stored is added to the ‘Storage’ field. Otherwise you cannot access the directory in your VDI. NCI provides more both user guides for VDI and PBS directives.

Launch VDI When you get everything setup and click Launch button you’ll be redirected to this page:

Maybe you will be in queue for a while, it depends on what kind of queue and how much source you apply, when the status at the top right turn to running, you can click Launch VDI Desktop to access your VDI.
Host ilamb result
This is the Desktop of your VDI:

Then open a terminal (top left of the VDI screen) and navigate to the ilamb result directory (default is _build directory), and use commmand below to host a localserver.
python3 -m http.server
You can then start Firefox in the VDI screen and access the following address: localhost address:
http://0.0.0.0:8000/
For our config.cfg example we expect to see the following website (which shows the available observational data in blue after clicking on Albedo and Surface Upward SW Radiation):

Clicking on CERESed4.1 under the Albedo measurements then opens a new tab which allows you to browse through more extended and quantitative comparisons of your selected Models when confronted with measurements from the Clouds and the Earth’s Radiant Energy System (CERES) project:

Jupyter-hub interface#
The Jupyter interface available via ARE can also be used to visualise the outputs of ILAMB.
ILAMB-DATA list#
| Albedo | CERESed4.1, GEWEX.SRB |
| Biomass | ESACCI, GEOCARBON, NBCD2000, Saatchi2011, Thurner, USForest, XuSaatchi2021 |
| Burned Area | GFED4.1S |
| Carbon Dioxide | NOAA.Emulated, HIPPOAToM |
| Diurnal Max Temperature | CRU4.02 |
| Diurnal Min Temperature | CRU4.02 |
| Diurnal Temperature Range | CRU4.02 |
| Ecosystem Respiration | FLUXNET2015, FLUXCOM |
| Evapotranspiration | GLEAMv3.3a, MODIS, MOD16A2 |
| Global Net Ecosystem Carbon Balance | GCP, Hoffman |
| Gross Primary Productivity | FLUXNET2015, FLUXCOM, WECANN |
| Ground Heat Flux | CLASS |
| Latent Heat | FLUXNET2015, FLUXCOM, DOLCE, CLASS, WECANN |
| Leaf Area Index | AVHRR, AVH15C1, MODIS |
| Methane | FluxnetANN |
| Net Ecosystem Exchange | FLUXNET2015 |
| Nitrogen Fixation | Davies-Barnard |
| Permafrost | Brown2002, Obu2018 |
| Precipitation | CMAPv1904, FLUXNET2015, GPCCv2018, GPCPv2.3, CLASS |
| Runoff | Dai, LORA, CLASS |
| Sensible Heat | FLUXNET2015, FLUXCOM, CLASS, WECANN |
| Snow Water Equivalent | CanSISE |
| Soil Carbon | HWSD, NCSCDV22 |
| Surface Air Temperature | CRU4.02, FLUXNET2015 |
| Surface Downward LW Radiation | CERESed4.1, FLUXNET2015, GEWEX.SRB, WRMC.BSRN |
| Surface Downward SW Radiation | CERESed4.1, FLUXNET2015, GEWEX.SRB, WRMC.BSRN |
| Surface Net LW Radiation | CERESed4.1, FLUXNET2015, GEWEX.SRB, WRMC.BSRN |
| Surface Net Radiation | CERESed4.1, FLUXNET2015, GEWEX.SRB, WRMC.BSRN, CLASS |
| Surface Net SW Radiation | CERESed4.1, FLUXNET2015, GEWEX.SRB, WRMC.BSRN |
| Surface Relative Humidity | ERA5, CRU4.02 |
| Surface Soil Moisture | WangMao |
| Surface Upward LW Radiation | CERESed4.1, FLUXNET2015, GEWEX.SRB, WRMC.BSRN |
| Surface Upward SW Radiation | CERESed4.1, FLUXNET2015, GEWEX.SRB, WRMC.BSRN |
| Terrestrial Water Storage Anomaly | GRACE |
IOMB-DATA list#
| Alkalinity | GLODAP2.2022 |
| Anthropogenic DIC 1994-2007 | Gruber, OCIM |
| Chlorophyll | GLODAP2.2022, SeaWIFS, MODISAqua |
| Dissolved Inorganic Carbon | GLODAP2.2022 |
| Nitrate | WOA2018, GLODAP2.2022 |
| Oxygen | WOA2018, GLODAP2.2022 |
| Phosphate | WOA2018, GLODAP2.2022 |
| Salinity | WOA2018, GLODAP2.2022 |
| Silicate | WOA2018, GLODAP2.2022 |
| Temperature | WOA2018, GLODAP2.2022 |
| Vertical Temperature Gradient | WOA2018, GLODAP2.2022 |
Advanced usages#
The analysis with ILAMB can be adjusted in many ways. We suggest to read the ILAMB documentation and tutorials for a complete overview, as we only showcase a few examples below.
Changing configure file definitions#
You can find more information on adjusting this file on the official ILAMB documentation.
Below we provide a list of definitions you can modify in config file:
source              = None
#Full path to the observational dataset

cmap                = "jet"
#The colormap to use in rendering plots (default is 'jet')

variable            = None
#Name of the variable to extract from the source dataset

alternate_vars      = None
#Other accepted variable names when extracting from models

derived             = None
#An algebraic expression which captures how the confrontation variable may be generated

land                = False
#Enable to force the masking of areas with no land (default is False)

bgcolor             = "#EDEDED"
#Background color

table_unit          = None
#The unit to use when displaying output in tables on the HTML page

plot_unit           = None
#The unit to use when displaying output on plots on the HTML page

space_mean          = True
#Disable to compute sums of the variable over space instead of mean values

relationships       = None
#A list of confrontations with whose data we use to study relationships, the syntax is "h2 tag/observational dataset". You will see the relationship part in the output if you specify some relationship.

ctype               = None
#Choose a specific Confrontion class.

regions             = None
#Specify the regions of confrontation

skip_rmse           = False
#akip rmse in program

skip_iav            = True
#Ship iav in program

mass_weighting      = False
#if switch to true, using an average data in a period to normalize

weight              = 1
# if a dataset has no weight specified, it is implicitly 1
Above are the general attributes you can use in config file. However, ILAMB has develop many sub-classes of Confrontation for some specific case, there are some specific attribute in those sub-classes:
--ConfCO2:

emulated_flux       = nbp
# prety much the same as 'derived', default is nbp in this case

sites               = None
# in this confrontation, it will use site data instead of space data, this attribute is to specify which sites will be used.

force_emulation     = False
# if switch to true, using emulated_flux variable even you have co2 in model-result.

never_emulation     = False
# is switch to true, only use co2 in confront even if you specify emulated_flux and dont have co2 in model_result

lat_bands           = "-90,-60,-23,0,+23,+60,+90"
# it will give a latitude boundary for sites to separate those sites into interval.

--ConfGSNF:

model_flux          = "nee"
# use one variable or derive of some variables to replace the target variable in model_result. It's quite useful if you don't have the variable required by this confrontation in your model_result.

--ConfNBP:

skip_taylor         = "False"
# skip Temporal distribution in program

--ConfSoilCarbon:

soilc_source        = None
# path to observational dataset of 'solic'.

npp_source          = None
# path to observational dataset of 'npp'.

tas_source          = None
# path to observational dataset of 'tas'.

pr_source           = None
# path to observational dataset of 'pr'.

pet_source          = None
# path to observational dataset of 'pet'

fracpeat_source     = None
# path to observational dataset of 'fracpeat'

y0                  = 1980.0
# start year

yf                  = 2006.0
# end year

--ConfEvapFraction:

hfss_source         = None (*)
# path to observational dataset of 'hfss'

hfls_source         = None (*)
# path to observational dataset of 'hlss'

#caution: those two variable is conpulsory if you specify ctype = 'ConfEvapFraction'

--ConfTWSA:

nbasins             = 30
# Adding a member variable called basins, add them as regions

--ConfPermafrost

y0                  = 1985.0
# start year

yf                  = 2005.0
# end year

dmax                = 3.5
# The maximum depth to consider in [m]

Teps                = 273.15
# The temperature threshold to use to indicate permafrost [K]

--ConfAlbedo:

energy_threshold    = 10
# engery threshold to build a mask

skip_weighting      = False
# options while run the mean state analysis

skip_cycle          = False
# options while run the mean state analysis
Model selection via --model_setup or --model_root#
In the above examples, we already showed you how select only a few examples of the available models, which are selected with a file (e.g. model_setup.txt) that is used via the --model_setup argument.
You can, however, also select all models, by simply using the keyword --model_root $ILAMB_ROOT/MODELS/.
Run specific regions via the --regions argument#
In the above examples, we have always chosen to perform comparisons on a global level.
You can, however, also choose other predefined regions like aust (for Australia) based on the Global Fire Emissions Database or define your own regions. To run ILAMB for several regions, use the --regions option and include the region labels delimited by spaces, e.g. --regions global aust
To use your own region, you need to create a new file, for example regions.txt with latidude and longitude limits for your regions and use it with the argument --regions regions.txt. This could be advisable if you want to include Tasmania (latitudes down to -43.75 degrees) into your comparisons for Australia, which is currently excluded from the default ILAMB aust definition (cutoff at -41.25 degress following the definition of the Global Fire Emissions Database):
#label, name                         , lat_min, lat_max, lon_min, lon_max
au_tas, Australia including Tasmania , -43.75 , -10.50 , 112.00 , 154.00
An Australia-focussed ILAMB run with the same setup as above and default aust region, would for example produce the following comparisons for ACCESS-ESM1.5 when confronted with albedo measurements of CERES:

For even more detailed region definitions, you can follow the ILAMB tutorial for custom regions.
Advanced Visualisation with the Land Model Testbed (LMT) unified dashboard#
The Land Model Testbed (LMT) unified dashboard, powered by Tabulator and the jQuery JS library, illustrates the high-level results from analysis and benchmarking software in the form of data tables (similar to a 2-D heat map). It treats the result as a function of multiple independent (hyperdimensional) inputs and displays the result as a combination of the two inputs.
LMT is the tool which ilamb officially used to deploy their result, it has some useful function which help people to go through ilamb result, so we suggest NCI user to use LMT aswell.
Install LMT#
There are two ways to get LMT installed, first is you can get it on their official repo here
git clone https://github.com/climatemodeling/unified-dashboard.git
Use LMT#
When you access to the directory you cloned, you will see the structure like this:
.
├── README.md
├── assets
├── dist
├── gulpfile.js
├── package-lock.json
└── package.json
Then you need to copy or build softlink of all the subdirectory and scalar_database.json in your ilamb result directory to dist.
then cd to dist and build your localhost there with command:
cd ./dist
python3 -m http.server
and you will see your ilamb result been deployed by LMT.
Specific explaination for use IOMB to evaluate ACCESS-OM2 raw data#
International Ocean Model Benchmarking (IOMB) is a model evaluation tool for Ocean model, it based on ILAMB and has the same way to use. Basecally IOMB and ILAMB are share the core procedure difference is different variables and observational dataset to compare with and different config file.
Since IOMB can not read the raw data of ACCESS-OM2, we will introduce a new tool to help people to CMORise non-cmip data.
ACCESS Post-Processor v4#
ACCESS Post-Processor v4(APP4) is a is a CMORisation tool designed to convert ACCESS model output to ESGF-compliant formats, primarily for publication to CMIP6. It uses CMOR3 and the CMIP6 data request to generate CF-compliant files according to the CMIP6 data standards.
install APP4#
Github repo of APP4, clone this repo to your local disk
git clone https://github.com/ACCESS-Hive/APP4.git
setup APP4#
After you clone the repo, you will find the repo structure like this:
.
├── CITATION.cff
├── LICENCE.txt
├── README.md
├── check_app4.sh
├── custom_app4.sh
├── input_files
│   ├── ccmi-2022
│   ├── cmip6-cmor-tables
│   ├── cmip6_pub_env.yml
│   ├── custom_mode_cmor-tables
│   ├── dreq
│   ├── experiments.csv
│   ├── grids.csv
│   ├── grids_om2-025.csv
│   ├── grids_om2.csv
│   ├── json
│   ├── master_map.csv
│   ├── master_map_ccmi2022.csv
│   ├── master_map_om2.csv
│   └── var_subset_lists
├── multiwrap_app4.sh
├── multiwrap_qc4.sh
├── production_app4.sh
├── production_qc4.sh
└── subroutines
    ├── app.py
    ├── app.pyc
    ├── app_functions.py
    ├── app_functions.pyc
    ├── app_wrapper.py
    ├── cleanup.sh
    ├── completion_check.py
    ├── custom_json_editor.py
    ├── database_manager.py
    ├── deprecated
    ├── dreq_mapping.py
    ├── qcfigs_index.py
    ├── quality_check.py
    └── setup_env.sh
for IOMB we only need some Ocean variables, so first step we need to specify which variable we want.
so we go to ./input_files/var_subset_lists and create a new .txt file
cd ./input_files/var_subset_lists
touch IOMB_variable.txt
in this new .txt file, we could specify frequency,variable
Omon,chl
Omon,o2
Omon,no3
Omon,po4
Omon,talk
Omon,dissic
Omon,mlotst
Omon,thetao
Omon,so
Next step is to change some user options in custom_app4.sh
You can define those options based on what you need follow the instruction, here we just provide an example for IOMB
To get variables, you can specify attributes like below
DATA_LOC=/g/data/p73/archive/non-CMIP/ACCESS-ESM1_5/
EXP_TO_PROCESS=                               # local name of experiment
VERSION=ESM                                   # select one of: [CM2, ESM, OM2[-025]]
START_YEAR=1850                               # internal year to begin CMORisation
END_YEAR=2014                                 # internal year to end CMORisation (inclusive)

VAR_SUBSET=true
VAR_SUBSET_LIST=input_files/var_subset_lists/IOMB_variable.txt

OUTPUT_LOC=/scratch/$PROJECT/$USER/APP4_output
PROJECT=$PROJECT                              # NCI project to charge compute; $PROJECT = your default project
ADDPROJS=( p73 p66 )                          # additional NCI projects to be included in the storage flags
QUEUE=hugemem                                 # NCI queue to use; hugemem is recommended
MEM_PER_CPU=24                                # memory (GB) per CPU (recommended: 24 for daily/monthly; 48 for subdaily)
After you get everything done, run custom_app4.sh
bash custom_app4.sh
then you will get CF-compliant netCDF files in OUTPUT_LOC
Cmoriser for ilamb#
We have developed a CMORiser for ACCESS raw data specifically for ILAMB. This allows users to run ILAMB directly with ACCESS raw data, eliminating the need for any additional CMORise pre-processing steps.
Usage of cmoriser#
We’ve integrated this CMORiser into the ilamb-tree-generator package, making its usage very similar to that of ilamb-tree-generator. This streamlines the configuration of ILAMB for evaluating ACCESS model data.```
“First, you will need a .yml file to store the metadata required by ilamb-tree-generator. Here’s an example:
datasets:
    - {mip: CMIP, institute: CSIRO, dataset: ACCESS-ESM1-5, project: CMIP6, exp: historical, ensemble: r1i1p1f1}
    - {mip: non-CMIP, institute: CSIRO, dataset: ACCESS-ESM1-5, project: CMIP6, exp: HI-CN-05}
The first entry represents a CMIP dataset, which is the standard usage for ilamb-tree-generator. The second entry corresponds to an ACCESS raw output, which is a non-CMIP dataset. Although most parameters are similar, there are specific settings for non-CMIP datasets. Here are the details of each parameter:
mip: Set tonon-CMIPto activate the CMORiser for non-CMIP data.path: For users working with their own ACCESS raw data, specify the root directory here. If not provided, the tool will default to using data in thep73directory.
run ilamb-tree-generator#
After setting up the config.yml file, run the ilamb-tree-generator. This will generate the CMORized data within the ILAMB-ROOT directory, making it accessible for ILAMB to read and use:
ilamb-tree-generator --datasets {your-config.yml-file} --ilamb_root $ILAMB_ROOT
Once it finish, you will get your CMORised data been stored by variable names in this format:
.
├── DATA
└── MODELS
    └── ACCESS-ESM1-5
        └── HI-CN-05
            ├── cSoil.nc
            ├── cVeg.nc
            ├── evspsbl.nc
            ├── gpp.nc
            ├── hfls.nc
            ├── hfss.nc
            ├── hurs.nc
            ├── lai.nc
            ├── nbp.nc
            ├── pr.nc
            ├── ra.nc
            ├── rh.nc
            ├── rlds.nc
            ├── rlus.nc
            ├── rsds.nc
            ├── rsus.nc
            ├── tasmax.nc
            ├── tasmin.nc
            ├── tas.nc
            └── tsl.nc
New Version of ilamb-tree-genertor for ESM1_6#
This notebook is a simple tutorial to demonstrate how to use the updated ilamb-tree-generator on Gadi to process raw ESM1_6 data.
The purpose of this new version is to cmorise raw output from the ESM1_6 model in order to make it compatible with ILAMB’s input requirements.
Currently, the tool only supports the following variables:
Emon:
'cSoil'
Lmon:
'cVeg','gpp','lai','nbp','ra','rh','tsl'
Amon:
'evspsbl','hfls','hfss','hurs','pr','rlds','rlus','rsds','rsus','tasmax','tasmin','tas'
Prerequisites#
You have an active Gadi account.
You are a member of the following NCI projects:
ct11,p66, andxp65.⚠️ Access to raw ESM1_6 data and the
ilamb-tree-generatormodule requires membership in these projects.
You can check your project memberships usingmyprojectsor request access via the NCI MyAccount portal.
Step1: Load the Module#
ilamb-tree-generator has already been deployed as a module under the xp65 group. Gadi users can load the module directly to use it.
module use /g/data/xp65/public/modules
module load conda/analysis3
Step2: Prepare a .yml file for metadata#
you will need a .yml file to store the metadata required by ilamb-tree-generator. Here’s an example:
datasets:
 - {mip: non-CMIP, institute: CSIRO, dataset: ACCESS-ESM1-6, project: CMIP6, path: /scratch/p66/pjb581/access-esm/archive/pi_concentrations-expt-c55f7217, output_range: [900,910]}
 - {mip: non-CMIP, institute: CSIRO, dataset: ACCESS-ESM1-6, project: CMIP6, path: /scratch/p66/pjb581/access-esm/archive/pi_concentrations-expt-c55f7217, output: 800}
Reused Attributes#
For the attributes mip, institute, dataset, and project, simply copy the values from the example above. These fields remain unchanged and have already been explained in previous versions of the tool.
New Attributes for ESM1_6 Raw Data#
path#
Specifies the location where the raw model outputs are stored.
In the example, we use:
path: pi_concentrations-expt-c55f7217
Replace this with the actual path to your data on Gadi.
output Indicates the specific output number you want to cmorise. For example, to cmorise output075, use:
output: 075
output_range Use this attribute if you want to cmorise a range of outputs. The input format should be a list containing the starting and ending output numbers. For example, to cmorise outputs output075 to output090:
output_range: [075, 090]
This will process all outputs from output075 through output090 (inclusive).
Step3: Run the Tool#
After completing the setup steps above, you can trigger the entire cmorisation workflow by running the following command:
ilamb-tree-generator --datasets config.yml --ilamb_root ./ILAMB_ROOT
This will generate the CMORized data within the ILAMB-ROOT directory.
Below is an example of the output directory structure after the process completes:
.
├── DATA
└── MODELS
    └── ACCESS-ESM1-6
        └── output915
        └── output916
        └── output917
        └── output918
            ├── cSoil.nc
            ├── cVeg.nc
            ├── evspsbl.nc
            ├── gpp.nc
            ├── hfls.nc
            ├── hfss.nc
            ├── hurs.nc
            ├── lai.nc
            ├── nbp.nc
            ├── pr.nc
            ├── ra.nc
            ├── rh.nc
            ├── rlds.nc
            ├── rlus.nc
            ├── rsds.nc
            ├── rsus.nc
            ├── tasmax.nc
            ├── tasmin.nc
            ├── tas.nc
            └── tsl.nc
Merge the results#
When using output_range to cmorise multiple outputs simultaneously, if you want to merge the results into a single file instead of storing them separately under different output directories, we provide a merge parameter to enable this functionality.
ilamb-tree-generator --datasets ./config_test.yml --ilamb_root $ILAMB_ROOT_TEST --merge
When triggering ilamb-tree-generator, set --merge to merge the results along the time axis, default it’s False without the --merge flag. The final merged output will be stored under the merged directory.
├── DATA
└── MODELS
    └── ACCESS-ESM1-6
        └── merged
            ├── cSoil.nc
            ├── cVeg.nc
            ├── evspsbl.nc
            ├── gpp.nc
            ├── hfls.nc
            ├── hfss.nc
            ├── hurs.nc
            ├── lai.nc
            ├── nbp.nc
            ├── pr.nc
            ├── ra.nc
            ├── rh.nc
            ├── rlds.nc
            ├── rlus.nc
            ├── rsds.nc
            ├── rsus.nc
            ├── tasmax.nc
            ├── tasmin.nc
            ├── tas.nc
            └── tsl.nc
Example#
Below is a complete example that demonstrates how to use ilamb-tree-generator to cmorise multiple outputs from ESM1_6 on Gadi and merge them for ILAMB evaluation.
First, to run the entire workflow, we need three files in one directory: config.yml, config.cfg, and pbs.job.

config.yml:
datasets:
 - {mip: non-CMIP, institute: CSIRO, dataset: ACCESS-ESM1-6, project: CMIP6, path: /scratch/p66/pjb581/access-esm/archive/pi_concentrations-expt-c55f7217, output_range: [start,end]}
config.cfg:
ILAMB config file, Configure them according to your experimental objectives. In this example, we use CMIP6.cfg.
pbs.job:
#!/bin/bash
# For help with PBS directives on Gadi, go to https://opus.nci.org.au/display/Help/PBS+Directives+Explained
#PBS -N ILAMB
#PBS -l wd
#PBS -P {Your_Project}
#PBS -q express
#PBS -l walltime=02:00:00
#PBS -l ncpus=48
#PBS -l mem=190GB
#PBS -l jobfs=10GB
#PBS -l storage=gdata/xp65+gdata/ct11+gdata/p66+{group_where_your_file_located}
#PBS -l jobfs=10GB

module use /g/data/xp65/public/modules/
module load conda/analysis3-25.04

export ILAMB_ROOT=$PWD/ILAMB_ROOT_ESM1_6
export BUILD_DIR=./ILAMB_ESM1_6


ilamb-tree-generator --datasets config.yml --ilamb_root $ILAMB_ROOT --merge

mpiexec -n 12 ilamb-run --config ./CMIP6.cfg --model_root $ILAMB_ROOT/MODELS/ --model_year [start_year_of_data] [target_year] --regions global --build_dir $BUILD_DIR
Above is an example pbs.job file. Fill in the parameters according to your experiment. The ilamb-tree-generator will cmorise the ESM1_6 data and build the directory structure that ILAMB can read, after which you can run ILAMB for your analysis.
One important thing to note is that since the ESM1_6 raw data are currently all simulated, you will need to apply a time shift if you want to compare them with observational data.
Hint:#
Each output from ESM1_6 typically contains only one year of data.
When comparing this with ILAMB’s observational datasets, the mismatch in time range can lead to failures during the benchmarking process.
Recommended approach:
To ensure a meaningful comparison and avoid time-related errors, it is advised to merge multiple outputs together before running ILAMB.